Key mountaineering equipment - unlocking the myths and retail jargon!
We
get lots of enquiries from people about what equipment they
should consider buying, especially about boots, crampons, ice
axes, and rucksacks. This page answers many of these questions.
All clients who book on a course receive a Course Info Booklet gives kit selection advice, and a course specific equipment page for
further details on different types of equipment, and for the kit geeks there's a full list of all kit, advice, tips and recommendations of everything you could ever need; link.
Click on the Spotify link to the right, to listen to our growing range of podcasts, including about how to choose suitable mountain boots, or click on this link for more details. These equipment podcasts are something that we are really keen to build up over the coming months, as it's such an easy resource to listen to on your way to work / out for a run / in the gym, without staring at the screen for hours!
This
page has been written and updated by our guiding
team, to give you unbiased information from
people who use the kit every day. The format of this
page is to review some of the most popular types in each category,
and then to provide further advice on fitting at the
base of each section. We hope it will answer your queries, and
help you avoid making any expensive mistakes. To jump to a section
that you wish to read about, click on an option below...
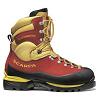
Mountaineering
Boots
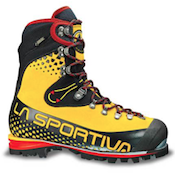
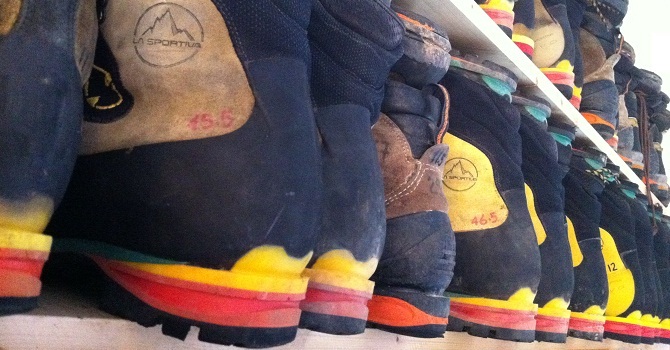
Good mountain boots are probably the single most expensive
piece of mountaineering equipment, and they often determine
your chances of success, as well as your comfort. Selecting
the right type of boot is crucial, and the table below explains
the different types that are on the market.
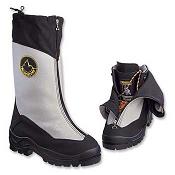
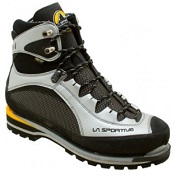
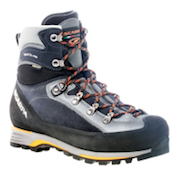
Expedition
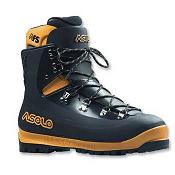
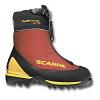
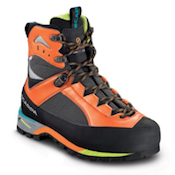
B3
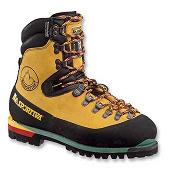
Alpine
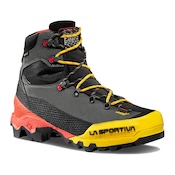
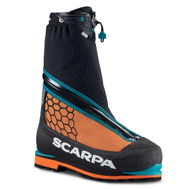
4 season B3
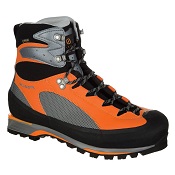
Alpine
3 season B2/3
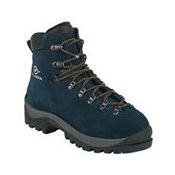
UK
4 Season B2
Alpine technical
B2
E.g.Sportiva
Spantik, Olympus Mons
E.g. Sportiva Nepal Extreme, Scarpa Freney.
E.g. Scarpa Charmoz Pro, Sportiva Trango Ice Cube
E.g. Scarpa Manta, Zamberlan Expert Plus
E.g. Sportiva Aequilibrium or Trango, Garmont Tower
Info: These
styles of boots are the softer and warmer version of the
B3 plastics. They too have a separate inner boot, but
the main feature is the integrated waterproof and thermal
gaiter which is built into the sole unit so is always
attached.
Info: This
type of boot has a solid sole unit, but a more flexible
upper section. There is built in insulation, so it can
be used in the summer or winter, and. It accepts all crampon
types so is versitile from rock to snow & ice. The
one boot solution for Alpinists.
Info: These
styles of boot have less insulation than a full B3, and
so are lighter in weight, and have slightly more flexible
uppers. This makes them more precise for more technical
climbs, but they still have a very good sole unit for
new matic crampons.
Info: Designed
for winter hill walking (e.g. Scotland / Lakes) and it accepts crampons. As an Alpine boot for snow routes (e.g. Mont Blanc) it lacks
insulation, so feet may feel cold, and the more flexible sole unit causes metal fatigue
in crampons over time.
Info: This
style of boot can accept crampons, but is not super rigid.
It is really good on technical terrain, for glacier approaches, via ferrata. It does not offer quite as much ankle
support as a B3 boot. Very comfy, so great for long Alpine days if it's not too cold.
Uses:
Only for expeditions to high altitude such as Acocncagua
or Mount Elbrus. Not for the Alps.
Uses:
For all snow route type climbs, e.g. Mont Blanc or Dufourspitze, this boot is a perfect choice.
Uses:
Perfect for technical summer Alpine courses, like Matterhorn / Eiger, but they aren't the warmest.
Uses:
Whilst the boot is popular in the UK, it is only suitable
for Alpine glacier travel and intro type courses.
Uses:
These boots are ideal for all technical
courses as they are lightweight, and rocky climbs e.g. Matterhorn.
Alternatives:
See below
Alternatives:
See below
Alternatives:
See below
Podcast
author
Icicle Podcast date
29/10/2010
Podcast
on selecting boots
In this podcast we explain the choice
of boot types and styles, and which
are the best for activities from trekking
to ice climbing. We take a look at crampon
compatability, insulation and flexibility
of the different boot types are considered.
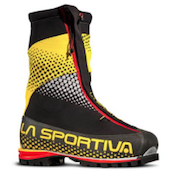
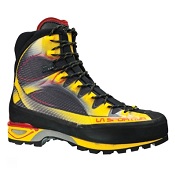
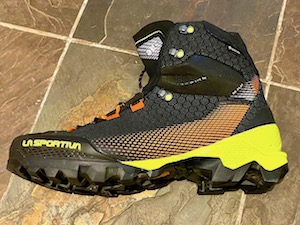
All the boots outlined above were featured as popular boots we commonly see on our trips, that guests have bought, albeit sometimes not the most recently, though they still perform well. It can't have escaped your notice that there's a wave of new technology and models of mountain boots sweeping the market at present, that are ripping up the rule books. They are super lightweight, yet share features of B3's & B2's & B1's, yet take any crampon.
The leading example is the amazing La Sportiva Aequilibrium boot (photos below), but there's also the Mammut Taiss or Arcteryx Acrux, and many more. Boots like these are a game changer in terms of technical performance, light weight, and grip. Compared to a 'pure' B3 they won't have the same thermal performance on snow climbs, but where the terrain is more technical on a peak such as the Matterhorn or Eiger, they're a perfect choice.
We have adapted with the times, and with climate change, so trip kit lists that once always said B3's were obligatory, now say B2 / B3, but there's always the proviso that if very cold or snowy, that B3's may be required (hire locally). Can you wear your Aequilibrium's on Dufourspitze or Mont Blanc or in Scottish winter courses? Yes for 90% of the time, but be ready to accept their thermal limitations if there's fresh snow or it's unseasonally cold.
Advice on buying mountain boots
1) When buying some new boots, ask which types of crampons will
fit them. Grivel, Black Diamond and Petzl crampons dominate the market.
2) For the Alps in summer Grivel G12's are ideal choice for all
the classic routes (eg Intro, Summits, Matterhorn, Classics
courses), whilst Grivel Rambo's are good for the more technical
courses (eg Extreme and Winter Ice).
3) Wearing more technical
crampons than is necessary for a route, can actually slow your
progress, and is always much less safe. Ask us for advice if
you are in doubt.
4) Wear a normal thickness pair of socks when
trying on the boots, walk up and down stairs and kick the wall
(or a step) hard, to simulate crampons use on ice. If you feel
your toes on the front, go up another size. Shops will not accept
used boots back, and it could affect your course.
5) Consider how
you need to maintain your boots, such as the regular waxing
/ treating that leather boots require to keep the leather supple.
If a sales person is pushing you to getting a particular pair,
ask if they have used them.
6) Think how
you will use the boots after your course, and try to achieve
a balance. A pair of plastics for use on an Intro course is
no use if all you will do on return is to walk in the Lake District,
but would be useful if you were going to get into ice climbing
in Scotland, or return to the Alps again. Boots are a major investment, and it's really important to purchase a boot suitable for it's immediate use, and your regular anticipated use in the future.
7) Different brands build boots in their oen foot lasts (mounds), so if you'd found that say a Scarpa walking boot suits your foot shape, the same brand should be your initial go to for considering a mountain boot. In very simplistic terms, most northern European brands typically have foot lasts that are slightly more hobbit feet shaped (wide toe box and broad heel), wheareas southern European brands usually have a narrower heel.
Still confused by all the choice of boots, and their suitability?
Don't stress! We've also written a blog post on the tricky decision of whether to select B2 or B3 mountain boots, so give it a read. Click here
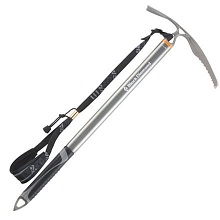
Mountaineering &
Technical Ice Axes
Advice on buying ice axes
1) Once you have selected the most suitable type of axe, the next most
important thing to consider is the handling
of the axe. This does not just mean swinging the axes all round the
shop, but how the
weight and shape of the axe suit you. Always test an axe wearing
the kind of gloves that
you would use on the course, as different brands and models
have varying forms of shaft and head.
2) In terms of the length, for a technical axe, 50 or 55cm is best. For a classical axe, the length that is ideal for ice axe arrests and general mountaineering is between 50 and 60 cm. There is a current trend for clightly shorter axes, as they are more versitile, whilst long axes can only really be used on snow plod type routes.
3) You do not need a leash on a classical axe. It is common to see people using them, but this is generally because they are less skilled hill walkers, not mountaineers, and more importantly the use of a leash on snow climbs restricts the ease of swopping your axe immediately to the uphill hand as you zig zag up a snow climb, so could make you unsafe. The leashes are also a potential trip hazard.
4) Another point to note is that all axes
sold in Europe are stress tested by the UIAA, and are awarded
either a B (basic) or T (technical) rating. Basic axes will
meet the needs of snow mountaineering (self-arrest, boot-axe
belays, glacier climbing, chopping steps, etc.) but may not
have the strength to withstand high-impact forces like those
generated during ice climbing. Technical axes can withstand
these greater forces, and so are awarded the T rating.
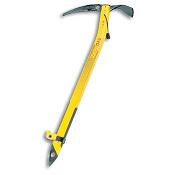
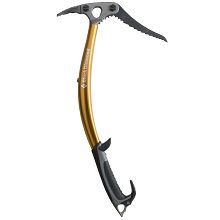
Classic Axe
Curved Classic
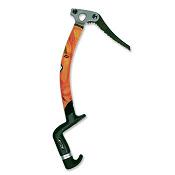
Technical Axe
Leashless Technical
Dry Tooling Axe
Examples: Grivel Air Tech, Black Diamond Raven
Examples: Grivel Evolution, DMM Cirque
Examples: Petzl Quark, Black Diamond Viper
Examples: Petzl Nomic / Ergo, BD Fusion
Examples: Grivel
X-Monster
Information: This
type of axe is the classic Alpine form, with a curved
pick and a straight shaft. The rubber grip at the base
of the shaft is not always necessary, but is a good
feature. A leash is not needed for this style of axe
as you could trip up over it.
Information: Several
manufacturers have started to produce a slightly curved
shaft on classic axes, to emulate the very curved shafts
of technical axes. This feature does not really save
your knuckles as the curve is so slight, but it handles
well.
Information: This
type of axe comes in a adze (shown) and hammer form,
and is used in pairs on technical routes including ice
climbing, mixed routes and technical alpine. It can
be used with a leash, or leashless (by using a spur
/ cup at the base of the shaft).
Information: These
types of axes are for very high level ice and mixed
/ dry tooling routes, and are leashless. They normally
only come as hammer versions, and are used in pairs.
The tools were developed to conform with Ice World Cup
regulations.
Information: This
type of axe is not classified as PPE (Personal Protective
Equipment), as it is not strong enough to survive the
tests, as it is so lightweight. It is purely for expert
level climbers on technical dry tooling or mixed routes
of a very high grade.
Suitability: For all summer courses from
Intro level to Mont Blanc / Matterhorn, this is perfect.
Suitability: This is only slightly better
than a classic shaped axe, but could be used on all
the same Icicle courses.
Suitability: For all ice climbing courses,
and for Advanced Level courses, and Tech "Ice &
Alpine" courses.
Suitability: Only for ice climbing courses
where you are climbing grade V, or for dry tooling /
mixed routes.
Suitability: Not suitable for any ice courses
unless you are booked on a specific dry tooling course.
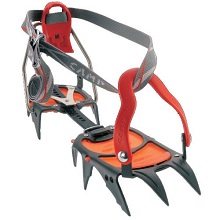
Mountaineering &
Technical Crampons
Advice on buying crampons
1) Apart from choosing the correct type of crampon, the next stage is to find one that suits your boots. Some retailers use a C1, C2, C3 system to mirror the B1, B2, B3 boot system. This does not always work as it is possible to strap any crampon to a B3 boot, and vice versa to strap a B1 boot to a rigid cramon. The results are not always ideal, but in some cases can work.
2) Some of the best manufacturers of crampons are Grivel, Petzl and Black Diamond. Take your boots to the store to check the fit, so the crampo should match the shape of the sole of your boots (i.e. no gaps on the edge, or any points other than the front and possibly second rows of points protruding outside the footprint of the boot).
3)
Crampon bags aren't really necessary, as the crampons spend most of the time on your boots, and you end up carrying an empty crampon bag around all day in your rucksack.
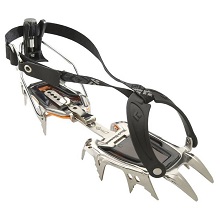
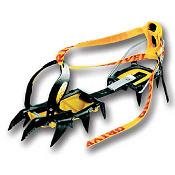
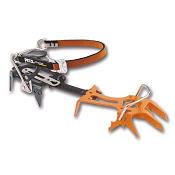
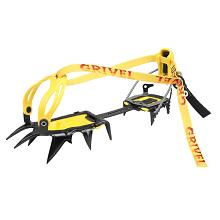
Classic
Hybrid
Technical
E.g. Grivel G12, BD Sabretooth
E.g.Grivel G14, Petzl Sarken
E.g.Grivel Rambo, Petzl Dart
Information: The
twelve point crampon is the classic type for mountaineering,
as it provides far more security than the 10 point walking
crampon. There are many bindings options, but the one
shown here is the most versatile, with plastic toe bail
and heel clip.
Information: This
crampon is essentially the back 10 points of a G12 (see
above), with some technical front points. It is a good
entry level ice climbing crampon, and can still be used
on snow routes, though note the front points get worn
on mixed.
Information: These
vertical front points and agressive second and third
points are designed for hard ice or mixed routes. Generally
they all have metal toe bails. Often technical crampons
are unsafe for classic mountaineering, due to balling
up with snow.
Suitability: For all mountaineering courses
this is the best option, but not on most technical / ice courses.
Suitability: For Intro and Improver ice courses,
and for Technical "Ice & Alpine" or Advanced
courses
Suitability: For all ice climbing courses,
but not for any other non Advanced level mountaineering
courses.
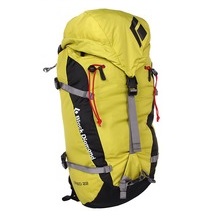
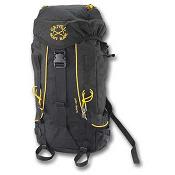
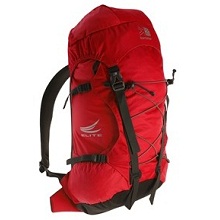
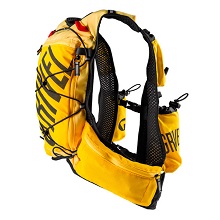
Mountaineering &
Technical Rucksacks
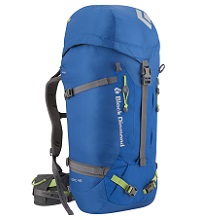
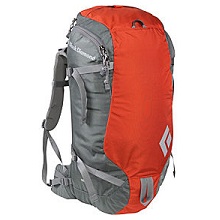
Examples:
Alpine climbing rucksack, Lowe Alpine Attack, Grivel, Deuter,
Back Diamond, Karrimor Information: The
ideal size for an Alpine rucksack is between 30 and 40 litres,
if you are doing day climbs, or are staying in a hut. A larger
pack is required for technical routes where a lot more kit needs
to be carried, or you require a bivouac. If you plan it right,
on the summit (or coldest part of the day), you should only
have food, water, and a spare layer of clothing in your bag,
so a large bag is not necessary. In the Alps the key is "light
is right". Suitability: All these rucksacks are suitable for all Lakes / Scottish / Alpine courses, but for
expeditions a larger bag will be required. Also note that for
ski touring it is essential to have ski straps on the side of
the bag, which all the featured models above offer.
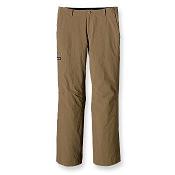
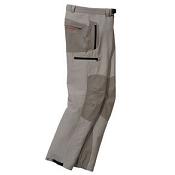
Mountaineering
Trousers
Do
you really need to be told what to wear? Hopefully not,
but we do get a lot of queries each season about what
type of trousers are suitable for climbing, so
here you are! Any lightweight trekking or soft shell style
climbing trousers are fine, but if you are buying some
anyway, opt for lighter colours (not black) so you do
not get too hot in the sun. Internal features such as
snow skirts are good, but an optional bonus as you normally
wear gaiters over the top of the trousers for the majority
of the time. Also check that the waist buckle / fastening
system is comfy to wear under your climbing harness, so
it does not rub. Other
features to look for are crampon / scuff patches on the
inside leg at the base, as this area is usually where
climbing tousers get the most wear.
You
do not need full on shell trousers or salopettes, except
for in the rain, and if it is raining, it is snowing up
high, so the chances are that the avalanche risk will
limit climbing anyway. Also
they are too heavy and lack flexibility and breathability. Thick shell trousers are good for ice climbing where you are in contact with the ice, or for long approaches in deep fresh snow.
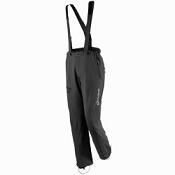
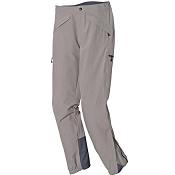
Lightweight water-proof overtrousers are fine to put over your climbing trousers in case of rain. The climbing trousers featured in the photos here are all
recommended for our climbing courses, so clockwise from
top left the Mammut Courmayeur, Quechua Bionassay, Patagonia
Guide, and Patagonia Rock Pant.
Most
suitable climbing trousers are not lined, as this is too
hot, but have flexible and durable knees and often no
braces or bib so as to keep them light. For winter climbing
the same trousers are often fine, but with thermal leggings
underneath, or water-proof trousers over the top.
In the
Alpine summers the temperatures in the valley can reach
mid 30's°C, and the freezing level is often above
4000m, so these trousers are generally all you are wearing
on your legs for the vast majority of the time. Your quadraceps
are doing a lot of hot work as you climb the mountains,
so keeping cool is normally more of an issue that keeping
warm.